
Day 04 - LVM and LVM Snapshots
We're jumping right into this, because it's pretty crazy. Like, mad crazy son. I haven't talked much about what lvm actually is. So I'm gonna attempt to do an introduction to it right now. Right here. Literally next.
An entire drive can be split into partitions. This is old news. What's also old news is that you can only have a maximum of four primary partitions on an MBR drive. While this is being phased out, it is still very popular. Additionally, what if you want to have a partition that's bigger than your entire physical drive? That sounds a little silly-- when exactly would you WANT to have more data than can fit on one drive? Just buy another drive and make a new filesystem and manage 'em no? Well that's annoying and not as cool as LOGICAL VOLUME MANAGEMENT. I hope I'm asking the right rhetorical questions here.
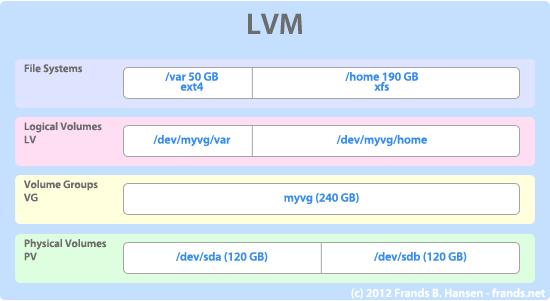
Okay, I've pretty much ALREADY butchered this explanation, so let's try to salvage what I've said so far with this diagram. At the bottom layer are the physical volumes. In this case, there are two SEPARATE devices (/dev/sda and /dev/sdb). They don't actually have to be the same size but in this case they are. Now, these could be like, a spinning hard disk and a flash drive, for example. Then on top of this you create something called a volume group (VG). On top of that are the actual logical volumes which can be split up however you want, and then finally those volumes can be formatted as filesystems.
For simplicity's sake, these instructions are going to refer to a single 32GB device, /dev/sdc that is assumed to be totally unallocated (no filesystems). While you span multiple different types of device media, lvm still has benefits to offer on a single physical device. You can play along at home if you'd like by destroying all the filesystems on it through a tool like parted or gparted.
pvcreate /dev/sdc1
vgcreate dat_group_name_tho /dev/sdc1
So now we've got ourselves a volume group spanning the entire USB stick. If you had an existing filesystem on /dev/sdc1, but some unallocated space after, you could also have created the physical volume (with pvcreate) on /dev/sdc2.
So now check this out:
lvcreate --size 10G --name first_lv dat_group_name_tho
This creates a single 10GB logical volume across the device. Keep in mind this now leaves us with 22GB left free to create more logical volumes within this volume group. This of course can be formatted an mounted just like any real disk.
mkfs.ext4 /dev/mapper/dat_group_name_tho-first_lv
mkdir /mnt/my_lvm
mount /dev/mapper/dat_group_name_tho-first_lv /mnt/my_lvm
Nothing special so far though, ya? WRONG. So in between the LV and the PV exists something called the device mapper, of which I know nothing about. Hopefully I will learn about it in the future, though. But thanks to this, it's possible to play with the data in some interesting ways, including making snapshots of the filesystem.
So here's how this diddy breaks down: a snapshot, from the moment it is created on a target filesystem, is a logical volume itself that will store the differences between it and the target volume. That is, physically the snapshot logical volume will ONLY contain the old bytes that have since been overwritten on the original device since it was taken. This means that the snapshot will be empty until a write is made on its target. Then the old data, before being overwritten will be written to the snapshot volume. Using this small set of differences, given a snapshot and its target, one can recreate the entire filesystem from the point it was taken.
lvcreate --snapshot dat_group_name_tho/first_lv --size 200M --name snap5_27_14 dat_group_name_tho
Above I've created a snapshot of our first_lv using lvcreate, just like other logical volumes, but using the --snapshot [target] argument. Now here's the fun part: MOUNTING that snapshot.
mkdir /mnt/snap
mount /dev/mapper/dat_grup_name_tho-snap5_27_14 /mnt/snap
When you mount it, you'll notice it mounts as a 10GB volume! Not the 200MB volume that we allotted it. You can now open both /mnt/snap and /mnt/my_lvm side by side. (Also, I should have noted that we should have created some files on /mnt/my_lvm prior to taking a snapshot of it...). The snapshot volume will contain the exact data that our lvm volume had when we took the snapshot, without taking up the same amount of space.
There's a caveat here though that I have not discussed: What happens when differences between the original and the target volume exceed 200MB? Well, the snapshot will then become invalidated. To ensure that the snapshot won't fill, you can make it the same size as the target volume (10GB), but then we lose the previous advantage of not requiring to be the same size as the target volume. It SEEMS kinda chicken and eggy, and oh whatever shall we do about it? WELL FRET NOT.
Tomorrow I will discuss what I know so far about lvm thin provisioning (which is what my actual internship is around-- reviewing that the lvmthin documentation is up to date.), and in particular how it addresses this little snapshot dilemna.
Before I go, I found this special mirror-outlet today on a mirror in the building. WHAT. That's amazing.
Oh also, I forgot to mention, a snapshot is 100% read and writable, just as if it were the original filesystem, without taking up the same amount of space (as it shares the common bytes). AWESOME.